Cars

Discussions, pics, the whole shabang!

Saturday, December 16, 2006

Volvo XC60 Concept - Auto Shows - Car and DriverDecember 2006

Volvo XC60 Concept - Auto Shows - Car and DriverDecember 2006: "Volvo XC60 Concept - Auto Shows
Volvo set to enter the expanding, premium-small-ute segment in 2009.
BY DAVE VANDERWERP, December 2006


These images of the XC60 concept, released ahead of its official debut at the Detroit auto show in early January 2007, are a clear indication of what the production XC60 will look like when it makes its way to market in early 2009.
The XC60 is based on the Land Rover LR2 platform, which also underpins the new S80, while the styling is a bold take on the current XC90’s. The shape is definitely sleeker, looking almost stretched, with strong character lines running the length of the profile. Volvo says this makes the XC60 look like an “elegant, sporty coupe” but we see more of a wagon—think Cadillac SRX—but, to us, that’s not a bad thing.
Inside is a more futuristic version of Volvo’s floating center stack that we’ve already enjoyed in the S40 sedan and V50 wagon. To that, Volvo has added “visually floating” front and rear seats. Who knows, all this obsession with floating could lead to a Volvo blimp or hovercraft concept one day.
The XC60 concept also has Volvo’s new City Safety low-speed, collision-avoidance system, which is active at speeds below 20 mph and will automatically apply the brakes if the driver happens to be paying too much attention to his Blackberry.
Volvo didn’t mention what is powering this concept, but we wouldn’t be surprised to find the new, 235-hp 3.2-liter inline-six that powers the entry-level version of big brother XC90 as well as the LR2.
The “Small Premium Utility” segment—things like the Acura RDX, BMW X3, and Land Rover LR2—is the fastest-gro"

Wednesday, December 13, 2006

Car and DriverJanuary 2007-10Best Cars

2007 10Best Cars - 10Best Cars - Car and DriverJanuary 2007: "2007 10Best Cars - 10Best Cars
Our annual stomp in the woods turns up 10 outstanding machines.
BY CSABA CSERE AND TONY SWAN, PHOTOGRAPHY BY AARON KILEY
January 2007


Every year the entire Car and Driver staff gathers at a rural site about 30 miles west of our home office in Ann Arbor, Michigan for a week of evaluating all the new cars and, hopefully, avoiding cops. We judge the cars in three general areas: First, how well the car performs its intended functions. We expect sports cars to be fast and exhilarating, while we presume a family sedan will be practical. Second, we show a preference for the more engaging cars in each category; be it better driving manners, a double-take-inducing look, or a powerful engine. Finally, we are suckers for a good deal, so an inexpensive car that’s fast, fun, and practical will certainly rise to the top of our list.
The invite list works as follows: Last year’s winners are automatically invited back, as well as other all-new or significantly upgraded machinery for 2007 — each car gets only one shot at making our 10Best list, but many stay on the list for years. This year, all cars had to have a base price no higher than $71,000, which is 2.5 times the average new-vehicle transaction price as of August 2006. Eligible cars must be on-sale no later than January of 2007, and the manufacturer must, of course, deliver an example for our evaluations.

http://www.caranddriver.com/bestcars/12056/2007-10best-cars.html

Friday, November 03, 2006

Peugeot 206: North America's should-be small car

The Peugeot 206 is a french car boasting two petrol engines (which would obviously be changed for the North American market) and a diesel with a claimed 76 MPG. The diesel has 68 horse power and 120 Lb per ft of torque, which is available at low RPMs since it's a diesel. Available 5-speed manual or 4-speed automatic with tiptronic. Power steering is present as well. This car has good looks as far as sub-compact cars are concerned. Way better than the Yaris which has the best styling in the class in North America(the new Aveo is a close second).


JZP

Tuesday, September 26, 2006

Look ma! No hands!

Seriously people what has this world come to? Heat seeking missles, calculators, LED flashlights, and now self-parking cars. Yes that's right. Lexus (who else) has engineered the LS 460 to park itself. Watch the video at http://video.msn.com/v/us/v.htm?g=FB9F336F-51B7-45F9-939E-995C0AE41BBF,A14C830A-16A6-47CC-8643-350E95FA6885,091E035E-5C66-4E58-9FA6-ADF9E242F041&t=m11&f=15/64home&p


Regards my lazy companions,

JZP

Friday, September 15, 2006

How to install a subwoofer

From ehow.com


Most car manufacturers do not include subwoofers with the factory stereo system. The process of installing them can be complicated, so avoid hassle by purchasing a prefabricated enclosure box equipped with subwoofers.


Steps:
1.
Strip out the carpeting from the trunk and clean the metal surface.

2.
Take sound-deadening material (Dynamat or Accumat), and heat it with a heat gun or hair dryer or just leave it out in the sun to heat.

3.
Spray glue on the metal surface of the trunk, peel the back off the Dynamat or Accumat and apply the material to the metal surface. Use the heat gun or hair dryer to continue heating as you apply.

4.
Using a roller, press the material onto the metal so that it bonds with the surface.

5.
Replace the carpeting.

6.
Reconfigure the speaker hookups on your four-channel amplifier so that the front and rear speakers already in the system are using the two front channels of the amplifier. The front channels of the amplifier should have a high-pass crossover to work these speakers.

7.
Bridge the rear channels of the amplifier into mono so that the amplifier will supply twice the power. The instructions that came with the amplifier will show you how to do this.

8.
Wire the two subwoofers into the amplifier using 12-gauge speaker wire. The rear channel of the amplifier should have a low-pass crossover.

9.
Test to see what the best crossover point is for the subwoofers.

10.
Use metal L brackets to brace the enclosure. Secure the box to the floor, a wall or the rear deck. Be sure to place silicone around the bracket so that air will not leak from the box.

Tips:
Play around with the positioning of the subwoofer box in the trunk to get the sound you want. You may find it best to point the box so that the subwoofers are aimed toward the rear or toward the interior of the vehicle. When pointing toward the rear, the sound wave has a longer distance to travel, and you get more bass as a result.

To test for the best crossover point for the subwoofers, set the low-pass crossover of the amplifier at 100 Hz and play something on your system. Watch the movement of the subwoofers. The lower the crossover-point frequency, the less movement on the subwoofers. Watch to see whether the subwoofers are moving too much and listen to the music to determine whether there is distortion. Most systems run at 85 or 80 Hz.


Warnings:
Before you place the L brackets, check to see what is on the other side of the surface you will be screwing into. You don't want to cut a gas line or wire.

Tips from eHow Users:
Position by eHow FriendWorried about buying expensive subwoofers and having them stolen because they are always on show? Consider ditching the box and placing the subwoofers underneath the rear seats. This is also good if you have several places that vibrate, because the subwoofers are secured tightly. In addition, there's hardly any loss of quality.

Tuesday, August 29, 2006

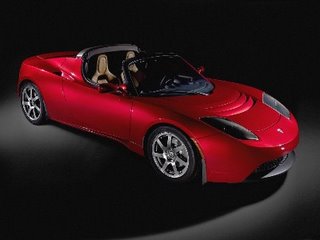
Electric Dream

It's finally happened. An electric sports car. The Tesla. According to the Tesla homepage, it has 6800 lithium-ion batteries, 0-60 comes in 4 exhilirating seconds, and it has the equivalent of 135 MPG! The price, $100,000. Well worth it if you think about it, stunning good looks, heart-attack performance, and no gas tank to fill.


JZP

Wednesday, August 23, 2006

Basic Mechanics (Guest speaker)

Changing Lights

To change a blown bulb or broken bulb you need to pull it out of the light and unscrew it from the harness, and put in your new one in.

Changing Wheels

Well first thing you have to do is apply the break, if not you will be have trouble keeping the wheel from turning. When the car is off the ground like on axle stands, hand break for the back wheels. Then get a breaker bar and socket to take them off, or an impact gun.

When putting them back on you have to tourque each bolt to factory specs.

For the fronts you will have to get someone to apply the break when its on axle stands so the wheel dosnt turn. With old cars the wheel might be stuck to the caliber, so you might need a mallet to hit the tire on each side to get it off.

Installing Tornados

On the tube going to the air box undo the clamp with a screw driver . place the tornado in with the arrows facing left then wiggle it then do the clamp back up.

Removing the hood

First unhook the hose for the windsheild wash, just pull it. Then theres two bolts on each bracket for the hood. Get someone on the other side to hold it so it dont fall through the windsheild.

Removing the hood brackets


Undo the 2 bolts on each bracket for removal. Heres a big tip, take a silver or black marker and mark around where they mount. So when you put them back on it will be in the perfect place and you wont have to fool around with it when putting them back.

Engine

INSTALLING A CRANK- Before installing a cam shaft its smart to lube the journals. After that place the end of the cam shaft into the middle hole of the block. Don't nick the journals when installing the cam shaft into the block. Take your time.

INSTALLING A DISTRIBUTOR- Set the engine so that the number one cylinder is at top, dead center then place the distributer in at 90 degrees. After that take the spark plug wires and install them according to the directions.

Panels

1. raise the vehicle, support it securely on jackstands and remove the front wheel.
2. Disconnect the antenna and all light bulb wiring harness connectors and other components that would interfere with fender removal.
3. Remove the clips and or bolts, detach the fender liner, then remove the fender mounting bolts
4.detach the fender. It is a good idea to have an assistant support the fender while its being moved away from the vehicle to prevent damage to the surronding body panels.
5. Installation is the reverse of removal.
6. Tighten all nuts, bolts and screws securely.